Switch to dedicated servers has been at unprecedented level like never before. Reason is far clear as the evolving businesses leverages the power of bare metal dedicated servers to harness all the advantage offered at the table. Let’s look at the benefits of dedicated servers and how mid-sized companies can take advantage of them.
You are about to learn creation of Minecraft server on different platforms in this tutorial.
It’s always fun to be a part of any immersive game. Minecraft is among few such top rated game played worldwide among 70.6 million players. Playing this game in your own servers leverages much more tools and freedom- Altogether a new experience in itself. Let’s quickly learn how to make a Minecraft server on various platforms.
IN THIS POST
What is the Need of Making Your Own Minecraft Server?
Immense possibilities to be go wild with the imagination while creating a virtual world, being able to build everything as per your own liking make Minecraft widely popular and accepted creating its own niche among gamer fraternity. What’s great, you can take such experience to a whole new level by making your own Minecraft server.
Or you can make use a special offer from KwikServer and get your own Minecraft server up and running in just a few clicks.
Private Server on any day enables maximum utilization of available hardware. For the purpose of Minecraft, using a private server gives you more control over your gameplay. You can invite your friends or other users, install any mods, create your own rules, and much more.
It is unfortunate that, many people think that building a private Minecraft server is difficult and expensive. However, in reality, you only need a little bit of acquired knowledge about the command-line interface. What’s more, you can set up the server on your Windows, Linux, or macOS computer, so there’s no need to buy a new machine.
If you’re ready, it’s time to learn how to make a server for Minecraft.
How to Make a Minecraft Server on Linux?
In this section, let’s learn how to make a Minecraft server on a machine powered by Ubuntu or CentOS.
To begin with, you need to ensure that you have a root SSH access to your machine. If you are using Servers Purchased from KwikServer, Please check for login credentials in your account or simply can check your Email ID for the same.

If you have slightest of familiarity with these OS, you would be able to differentiate and appreciate the distinct server creation process while installing the required packages.
1. Installing Java and Screen
Before we begin, keep in mind that the minimum operating system requirements for the following tutorial are Ubuntu 16.04 and CentOS 7.
Connect to your server via SSH. Open the built-in terminal shell (PuTTY for Windows users) and type the following command:
ssh username@ipaddress
NOTE: Please replace both values with your real username and server IP address. When prompted, enter your username and password.
1. It is prerequisite for a Minecraft server to have Java. Therefore, check whether it’s installed on your system by executing this command:
java -version
2. Proceed to the second section of this tutorial if you already have Java installed. However, if Java is not found, follow the next step.
3. Run these two commands to download the latest software packages and install Java:
On Ubuntu:
sudo apt-get update
sudo apt-get install default-jdk
On CentOS:
sudo yum update
sudo yum install java -y
4. Once Java installation is complete, you can install Screen:
On Ubuntu:
sudo apt-get install screen
On CentOS:
sudo yum install screen -y
2. Installing and Running Minecraft Server on Linux
Now that Java and Screen are ready, we can begin installing a Minecraft server.
1. Create a new directory where you will store all your Minecraft configuration files. This step is optional, but we highly recommend it to keep system organized. To do this, type:
mkdir minecraft
2. Move to the newly created directory by entering:
cd minecraft
3. Before we can download the required configuration files, install wget:
On Ubuntu:
sudo apt-get install wget
On CentOS:
sudo yum install wget -y
4. Use wget command to download the Minecraft server properties file:
wget https://launcher.mojang.com/v1/objects/bb2b6b1aefcd70dfd1892149ac3a215f6c636b07/server.jar
5. In this example, the latest server version is 1.16.1. You should visit this link to check if a newer version is available for download. If so, change the link for the command above.
6. Run the Minecraft server properties file by entering this command. If you want to use the graphical user interface, simply remove the nogui part from the command:
java -Xmx1024M -Xms1024M -jar minecraft_server.1.16.1.jar nogui
7. At this point, the server program will not start yet. Instead, it will create a EULA (end-user license agreement) file that we need to accept first.
8. To accept Minecraft’s EULA, open eula.txt file with Nano text editor:
sudo nano eula.txt
9. Find the line that says:
eula=false
Then change it to:
eula=true
Once done, don’t forget to save your changes by CTRL+O and exit by CTRL+X.
10. Once that is done, activate Screen so the server can run in the background:
screen -S "Minecraft server 1"
11. You can change the name based on your preferences.
Great job! You have successfully installed your custom Minecraft server on Ubuntu or CentOS.
3. Running Minecraft Server
Now, we are going to run the Minecraft server for real this time. Type the following command again:
java -Xmx1024M -Xms1024M -jar minecraft_server.1.14.4.jar nogui
The minimum requirement to run the server is 1024MB (1 GB) of RAM. That’s why we’ve entered 1024M after the -Xmx and -Xms parts. If you want to allocate more RAM, you can change the value to 2048M or above, given that your server offers such specifications.
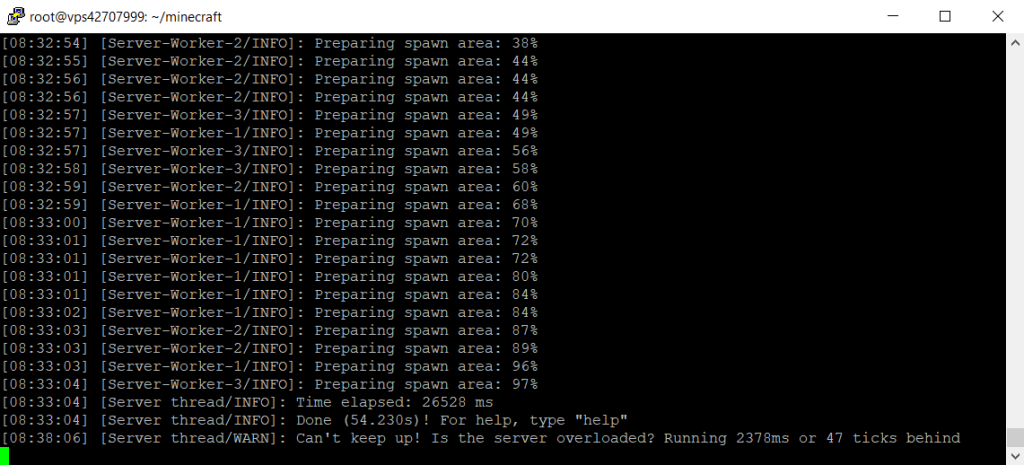
Here’s what you should witness after executing the command:

The server is now running in the background. To leave Screen, press CTRL + A, then D.
You can re-open the Screen window by typing this command:
screen -r
Should you need to customize the server settings, open the server’s properties file with Nano:
nano ~/minecraft/server.properties
Nonetheless, we suggest that you stick with the default configuration to prevent any issues.
How to Make a Minecraft Server on Windows

You can also set up a Minecraft server on your Windows PC. What’s great, the steps are easier than the previous one.
1. Open the command prompt and check the Java version on your computer:
java -version
2. If it matches the latest server version on the official website, you can continue to the next step. In case it’s unavailable or outdated, download the installer.

3. Download the setup software (.jar file) from the official server page.
4. Create a new folder for the Minecraft server and move the .jar file to that folder.
5. Double-click the setup program to create a eula.txt file.
6. Open the EULA file and change the value from false to true.
7. Run the Minecraft server by double-clicking the .jar file. To do this, you might need to allow the program through the firewall.
Alternatively, you can open the command prompt and navigate to the dedicated Minecraft folder. For example:
cd Documents/Minecraft
Then, execute this command:
java -Xmx1024M -Xms1024M -jar minecraft_server.1.15.2.jar nogui
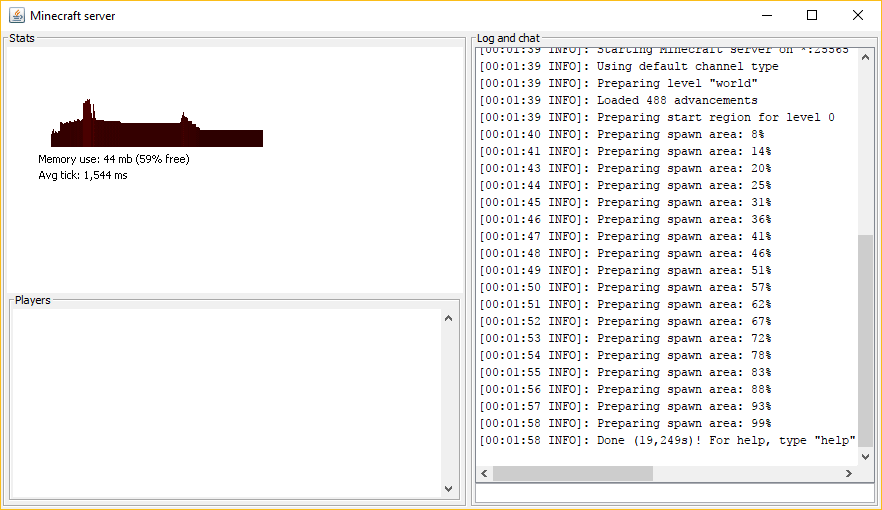
If you see a similar screen, it means your Minecraft server has successfully started:

How to Make a Minecraft Server on macOS

Lastly, let’s see how we can make a Minecraft server on macOS:
1. Note that Java is included by default on newer versions of macOS. You can double-check by entering this command on your terminal:
java -version
2. If it’s not available, you may download and install a legacy version of Java from the Apple website.
3. Create a dedicated folder for your Minecraft server. Then, download the Minecraft server setup program and put it in that folder.
4. Open TextEdit and set the format to plain text (Format -> Make Plain Text). Paste the following line:
#!/bin/bash
cd "$(dirname "$0")"
exec java -Xms1024M -Xmx1024M -jar minecraft_server.1.15.2.jar nogui
5. Save this file as startmc.command in the same directory where the Minecraft server file resides.
6. To make startmc.command file work, the execute permission is needed. To do so, open the terminal and head to your Minecraft folder. For example:
cd Documents/MinecraftServer
7. Grant the required permission using this command:
chmod a+x startmc.command
8.If the steps are done correctly, you should be able to start the server by double-clicking the startmc.command file. It will open a new terminal window.
9. A missing file or directory warning might appear at this time. Don’t worry, this is completely normal when you run a Minecraft server for the first time.
Conclusion
A Private Minecraft Server makes playing Minecaft more exciting any day, without an iota of doubt.

Now that, you have learned how to make a Minecraft server on Linux (Ubuntu and CentOS), Windows, and macOS, reward your new learning by successfully implementing the easy to follow step.
Happy building!


